
Thinking of moving from WordPress.com (or another hosted platform) to a self-hosted WordPress blog? You’re in the right place! In this guide, we’ll walk you through how to start a WordPress blog in 2026 on your own hosting. We’ll focus on HostGator for setup (since it’s beginner-friendly), and also highlight alternatives like Bluehost, SiteGround, and Hostinger.
A self-hosted WordPress site means you own your content and site entirely. You get complete flexibility to install any themes or plugins, and there are no restrictions on monetization. In fact, WordPress.org (self-hosted) lets you run affiliate links and ads freely, unlike WordPress.com’s rules which can limit monetization options. Plus, you’ll enjoy features like unlimited plugins, premium themes, and SEO tools. All in all, a self-hosted blog gives you full control over your site’s design and earnings potential (for example, via Cuelinks’ affiliate links).
Why Choose a Self-Hosted WordPress Blog?
Self-hosted WordPress (WordPress.org) is powerful for bloggers. Here’s why moving to self-hosted is a smart move:
- Full Ownership & Flexibility: You download WordPress and host it yourself. You choose your hosting provider (like HostGator) and have complete control. No one limits your customization.
- Unlimited Plugins/Themes: You can install any free or premium WordPress plugin or theme to add features (like SEO tools, contact forms, etc.) without restrictions.
- Total Monetization Freedom: Unlike WordPress.com, self-hosted sites have no affiliate or ad restrictions. You can monetize your content with ads or affiliate links (for example, via Cuelinks) and keep 100% of the revenue.
- Better SEO & Growth: You can use powerful SEO plugins, analytics tools, and optimize everything for search. This is great for appearing in Google’s top results.
In short, going self-hosted means you own your site (including hosting and domain) and can scale it as you like: essential for long-term blogging success.
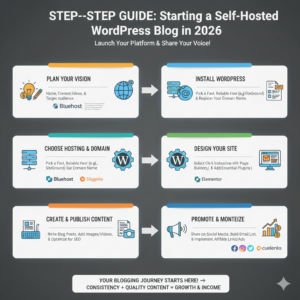
Step 1: Choose Your Domain Name and Hosting Plan
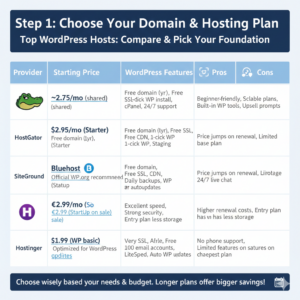
First, pick a domain (your website’s address, e.g. yourblog.com) and a hosting provider. Since you want to start a self-hosted WordPress blog, look for hosts offering easy WordPress setup and solid performance. We’ll focus on HostGator here. HostGator is known for beginner-friendly WordPress hosting: plans start around $2.75/month for shared hosting and often include a free domain for the first year. HostGator’s WordPress hosting also gives you free SSL, malware scanning, and 24/7 support.
Other top WordPress hosts include Bluehost, SiteGround, and Hostinger. For example, Bluehost’s WordPress starter plan begins at $2.95/month (promo) and includes a free domain and SSL. SiteGround’s StartUp plan (~€2.99/mo on sale) provides 10GB storage plus free SSL and daily backups. Hostinger offers plans from around $1.99/month with free domain on select plans and LiteSpeed caching for speed.
Choose a plan based on your needs (single site vs. multiple sites) and budget. For example, HostGator’s Baby plan lets you host up to 20 sites with 20GB storage, while Bluehost and Hostinger have similar entry-level plans. We’ll use HostGator as our example, but feel free to click the links below to compare features and pricing of these hosts:
| Provider | Starting Price | WordPress Features | Pros | Cons |
| HostGator | ~$2.75/mo (shared) | Free domain (1yr), free SSL, 1-click WP install, cPanel interface, 24/7 support | Beginner-friendly, scalable plans, built-in WP tools | Renewal prices higher, upsell prompts |
| Bluehost | $2.95/mo (Starter) | Free domain (1yr), free SSL, free CDN, 1-click WP, staging environment | Official WP.org recommended, simple setup | Price jumps on renewal, limited storage on base plan |
| SiteGround | €2.99/mo (StartUp on sale) | Free domain, free SSL, CDN, daily backups, WP autoupdates | Excellent speed, strong security, 24/7 live chat | Higher renewal costs, entry plan has less storage |
| Hostinger | $1.99/mo (WP basic) | Free SSL, free migrations, up to 100 email accounts, LiteSpeed servers, auto WP updates | Very affordable, optimized for WordPress | No phone support, limited features on cheapest plan |
Most hosts give deeper discounts for longer commitments, so consider a 12 or 36-month plan to save. Make sure to register your chosen domain during signup if it’s available; many plans waive the first-year domain fee (check terms).
Step 2: Sign Up with HostGator and Register Your Domain

Now let’s set up HostGator (the process is similar on other hosts). Go to HostGator.com and pick the WordPress hosting plan you want (or Shared Hosting if you prefer). During checkout, enter your domain name or select one if it’s free with your plan. For the domain step, you’ll see the option to either register a new domain or use one you own. Grab a .com or .net domain that matches your blog’s name: this is key for branding and SEO.
After choosing your plan and domain, create your HostGator account by filling in your email and payment info. (Tip: watch for coupons or promo offers at HostGator to get additional savings on hosting.) Once registered, HostGator will email your account details. Log in to your HostGator Customer Portal. From there, you can manage your hosting and domain.
HostGator makes WordPress setup easy: in the portal or cPanel, look for the “WordPress” or “MOJO Marketplace” icon. This tool lets you install WordPress with a few clicks. You’ll provide your site name, admin username, and password, then the installer does the work. Within minutes, WordPress will be installed on your domain.
(Alternative hosts: On Bluehost, after signup you also get a simple wizard that installs WordPress automatically. SiteGround and Hostinger similarly offer one-click WordPress installers in their dashboard.)
Step 3: Install WordPress (Self-Hosted Setup)
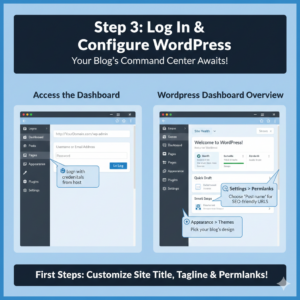
With WordPress installed via your host, you’ve completed the core self-hosted WordPress setup. Now you can log in to your new site’s admin panel. Typically, go to http://YourDomain.com/wp-admin and enter the admin username/password you set. This brings you to the WordPress Dashboard: the command center of your blog.
Here’s what to expect:
- Dashboard Home: An overview of your site and quick links.
- Posts: Where you write and manage blog posts.
- Pages: For static pages (About, Contact, etc.).
- Appearance → Themes: Pick or upload a theme for your blog’s look.
- Plugins: Install extensions for extra features (SEO, security, etc.).
- Settings: Set your site title, tagline, and permalinks (important for SEO).
Screenshot: The WordPress Dashboard after installation. From here, you can manage posts, pages, themes, and plugins.
Before moving on, adjust a few settings under Settings → General: make sure your Site Title and Tagline are correct. In Settings → Permalinks, choose “Post name” format so your blog URLs are SEO-friendly.
Step 4: Customize Your Blog’s Appearance
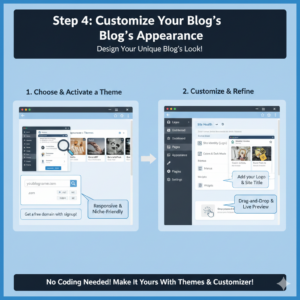
Now that WordPress is up and running, it’s time to design your blog. Go to Appearance → Themes. WordPress comes with a few default themes, but you can add thousands of free themes from the WordPress directory or upload a premium theme. Look for a responsive theme (mobile-friendly) that suits your blog’s niche. Some popular free themes include Astra, OceanWP, or GeneratePress.
Once you activate a theme, visit Appearance → Customize to tweak colors, fonts, header images, and more. Add your logo and set a background if desired. You can also set up a menu under Appearance → Menus (e.g. add links to “Home,” “Blog,” “Contact”). Use widgets (under Appearance → Widgets) to add things like recent posts or social media links in sidebars or footers.
Customization is mostly drag-and-drop and live-preview (no coding needed). Take your time to get a look you love. Remember, you can change themes or settings anytime.
Step 5: Install Essential Plugins
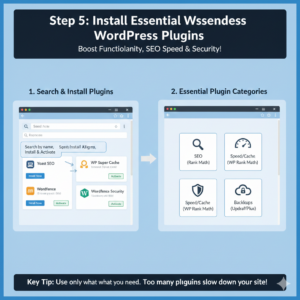
Plugins add functionality to your blog. For example, to boost SEO, install an SEO plugin like Yoast SEO or Rank Math. For site speed and caching, plugins like WP Super Cache or LiteSpeed Cache (HostGator uses LiteSpeed servers) are useful. Consider security plugins (Wordfence or HostGator’s SiteLock), and a backup plugin (UpdraftPlus) to safeguard your content. If you have an email newsletter, a plugin like Mailchimp for WP helps you collect subscribers.
To install a plugin, go to Plugins → Add New, search by name, and click “Install Now.” Activate it, then configure its settings. Keep the essentials active and avoid too many plugins (they can slow down your site).
Step 6: Create Your First Content
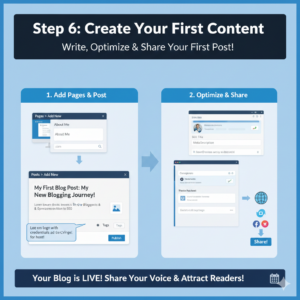
With your blog set up and customized, it’s time to create content! Start by adding a couple of pages like “About” and “Contact” (via Pages → Add New). Then, write your first blog post. Under Posts → Add New, add a catchy title, content, and images. Use categories and tags to organize your posts. Publish when ready.
Make sure to insert meaningful keywords naturally into your post. For instance, words like “how to start a WordPress blog 2026” or “self-hosted WordPress setup” for SEO. Also, optimize each post’s SEO title and meta description (if using Yoast or similar).
Once published, your blog is live! Share the link on social media or with friends to attract visitors.
Monetize Your Blog with Cuelinks

Once your blog has quality content and some traffic, you’ll want to monetize it. Cuelinks is a great affiliate network for Indian publishers. By signing up at Cuelinks, you can automatically convert product mentions into affiliate links. This way, whenever a reader clicks your affiliate link and buys something, you earn a commission. The signup is free, and Cuelinks even gives a signup bonus.

Pro Tip: After writing a post, highlight keywords or product names and use Cuelinks to generate affiliate links for them. Over time, this can turn your blog into an income source without extra effort.
Summary & Next Steps
Congratulations! You’ve set up a self-hosted WordPress blog on HostGator (or the host of your choice) in 2026. Let’s recap the key steps:
- Pick a domain and hosting plan (we used HostGator; alternatives: Bluehost, SiteGround, Hostinger).
- Sign up for hosting and register your domain.
- Install WordPress with one-click tools on your host.
- Customize your site by choosing a theme, configuring settings (site title, permalinks), and setting up menus.
- Install plugins for SEO, caching, security, etc.
- Create pages and your first post to launch your blog.
With these steps, your self-hosted WordPress blog is live and ready for visitors. Keep learning and customizing to grow your site. And don’t forget to start earning from your content, sign up at Cuelinks and begin adding affiliate links to your posts. This is the easiest way to monetize your new blog and start earning rewards from your writing.
Good luck with your new WordPress blog, and happy blogging! 🎉

Sahil Ajmera is content writer with more than 7 years of work experience in field of Affiliate Marketing, Digital Marketing, etc. He loves saving money on everything. His aim is to get readers exactly what they are looking for and that too without wasting much of their time. Whatever he is writing on, you are sure to find a way to earn & save good!


Comments are closed.