
WordPress is the most popular blogging platform. But beginners often wonder whether to use WordPress.com (hosted) or WordPress.org (self-hosted). The key difference is that WordPress.com handles hosting, updates, and security for you, whereas WordPress.org is free software you install on your own hosting. In other words, WordPress.com is an all-in-one service (with plans ranging from free to premium), while WordPress.org lets you choose any web host and install the WordPress software yourself. This guide walks through both approaches. We’ll cover block editor (Gutenberg) usage, picking themes, installing plugins, and optimizing your blog for SEO, speed, and security. We’ll also explain monetization (like using Cuelinks affiliate links) and end with a handy checklist.
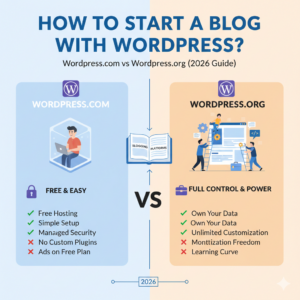
WordPress.com vs WordPress.org: Key Differences
- Hosting & Maintenance: WordPress.com is a managed hosting platform. It takes care of server setup, software updates, backups and performance tuning for you. In contrast, WordPress.org is software you download for free and install on your own web host. With WordPress.org, you must arrange hosting and handle updates yourself (though many hosts offer one-click installs and automatic updates).
- Cost: WordPress.com offers a free plan (with a yourblog.wordpress.com address) and paid plans that include custom domains, storage, and advanced features. WordPress.org itself is free, but you’ll pay for domain registration and hosting (which can vary widely in cost).
- Customization & Plugins: On WordPress.com, free sites have limited plugins and themes. To install custom plugins or upload third-party themes, you generally need a Business or Commerce plan. WordPress.org has no such limits: you can install any plugins or themes you like. This means WP.org offers far more flexibility (for example, thousands of plugins for SEO, security, e-commerce, etc.), whereas WP.com provides many features built-in (e.g. security, spam filtering, SEO) so you may not need extra plugins.
- Ease of Use: WordPress.com is very beginner-friendly. You just sign up on WordPress.com, choose a domain, and you’re live with minimal setup. WordPress.org requires more steps (getting a host, running the installer). However, WP.org gives you full control: you can tweak code, move hosts, and monetize more freely.
In summary, WordPress.com is ideal if you want simplicity and don’t want to worry about technical details, while WordPress.org is best if you want maximum control, customizability, and ownership of your content.
Setting Up on WordPress.com (Hosted)

- Sign Up and Choose a Domain: Go to WordPress.com, click Get Started, and create an account. You’ll be prompted to choose your site address: you can use a free yourblog.wordpress.com subdomain or upgrade to use a custom domain (e.g. yourblog.com). (A custom domain is often free the first year on paid plans.)
- Select a Plan: WordPress.com offers Free, Personal, Premium, Business, and higher plans. The free plan works for basic blogs, but upgrading unlocks custom domain support, additional themes, plugins, and monetization options. (For example, only Business plans allow installing custom plugins/themes.)
- Pick a Theme: Browse WordPress.com’s theme gallery and activate a design you like. WordPress.com provides many modern, mobile-responsive themes. You can customize colors, fonts, and layout using the built-in Site Editor (the block editor in full-site editing mode). WP.com’s themes are often optimized for Gutenberg blocks.
- Customize Design: Use the Customize or Editor tool (under Appearance) to tweak your site. Add your site title and tagline (under Settings > General), and upload a logo or header image if desired. Create a navigation menu via Appearance > Editor, adding pages or categories to it.
- Write Your First Post: In your dashboard, go to Posts > Add New. This opens the Gutenberg block editor for creating blog posts. Write your intro post (for example, introduce yourself and what your blog will cover) and hit Publish. Your new post will automatically appear on your site according to the theme’s layout.
- Built-in Features: Many features come built-in on WordPress.com: spam filtering (Akismet), basic SEO (XML sitemaps, meta), analytics (WP.com Stats), and a global CDN for images. You don’t need to install these yourself. For example, all WordPress.com sites include security protection, Akismet anti-spam, SEO support, CDN content delivery, and more. If you need additional features (like advanced SEO tools or custom code), you may upgrade to a higher plan.
- (Optional) Plugins & Upgrades: On the Free or lower plans, you cannot install third-party plugins. Upgrading to a Business plan lets you install any plugin you want. Essential plugins like Jetpack (site management), Yoast SEO, WPForms, or any performance/security plugin can then be added.
Example Screenshot: Suppose you’re adding a plugin on WordPress.com (Business plan). The plugin installer screen looks like this:
Screenshot: WordPress admin “Plugins > Installed” screen (example).
Here you can search for plugins like Jetpack or Yoast and click Install. On WP.com, Jetpack comes pre-connected if you choose a paid plan.
Setting Up on WordPress.org (Self-Hosted)
- Domain & Hosting: First, purchase a domain name (e.g. through Namecheap, Google Domains, etc.) and sign up for web hosting that supports WordPress. Many hosts offer one-click WordPress installation (Bluehost, SiteGround, Kinsta, etc.). Choose a hosting plan that fits your expected traffic (start small and upgrade as needed).
- Install WordPress: With most hosting, you can launch an installer (often called Softaculous, cPanel installer, or a WordPress “one-click” tool). Alternatively, you can manually download WordPress from WordPress.org (free) and upload it to your server. The famous “5-minute install” will guide you through setting a site title, admin username/password, and database details. Once complete, you’ll have a working site.
- Login and Basic Settings: Go to yourdomain.com/wp-admin and log in with your admin credentials. In the dashboard, set your site title and tagline under Settings > General. Also set your permalink structure to “Post name” (Settings > Permalinks) for SEO-friendly URLs. Make sure your site is running on HTTPS (most hosts provide a free SSL certificate).
- Choose a Theme: Navigate to Appearance > Themes. You can install a free theme from the WordPress repository or upload a premium one. Look for modern, mobile-friendly themes. For 2026, we recommend Gutenberg-compatible themes. For example, the popular Sydney theme is “fast, Gutenberg-friendly” and great for business/blog sites. OceanWP is another free, “Gutenberg-ready” theme with many demo sites. (You can also use the default WordPress themes like Twenty Twenty-Six, which support block-based full-site editing.) Once installed, click Customize to adjust colors, fonts, and menus. Ensure your design is responsive (mobile-friendly): in fact, expert lists emphasize that every featured theme is mobile-optimized.
- Install Essential Plugins: Go to Plugins > Add New. Here are key categories of plugins to install:
- Security: A security plugin (e.g. Wordfence Security or Sucuri) and a backup plugin (e.g. UpdraftPlus) are must-haves. They’ll help protect your site and recover it if something goes wrong. Remember: keep WordPress core, themes, and plugins updated to stay secure.
- Spam Protection: Akismet (free) blocks comment spam. Most WP.com features like Akismet need manual installation on WP.org.
- SEO: Install an SEO plugin like Yoast SEO or All-in-One SEO. Yoast SEO, for instance, “generates XML sitemaps and adds schema markup behind the scenes” and flags missing meta details as you write. This makes optimizing your posts much easier.
- Forms: For contact forms or surveys, install WPForms or Contact Form 7. WPForms Lite is popular and user-friendly.
- Performance: A caching plugin (e.g. WP Super Cache, WP Rocket, or LiteSpeed Cache) and an image optimizer (e.g. Imagify or Smush) will speed up your site. Image optimization is essential: WordPress.com recommends Imagify to compress images for faster loads. If you use Jetpack on WP.org, its Site Accelerator can also serve your images from WordPress.com’s CDN for free.
- Site Management: The Jetpack plugin (from Automattic) is a comprehensive suite covering security (firewall), backups, site stats, and more. It effectively “replaces five or six separate plugins” by bundling backups, security, speed tools, and analytics in one dashboard.
- Social & Misc: A social-sharing plugin, an analytics plugin (or Google Site Kit for Analytics/Search Console), and others can be added as needed.
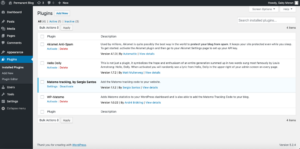
- Installing plugins: in the admin, click Add New, search by name (e.g. “Yoast SEO”), click Install, then Activate. The installed plugins will then appear under Plugins > Installed Plugins, as shown below.

Screenshot: WordPress admin “Plugins > Installed” screen (example).
This example shows installed plugins like Akismet and WP-Matomo. You can add, activate, or deactivate plugins here.
- Configure Installed Plugins: After activation, most plugins have a settings page (often under Settings or their own menu). For example, set up the SEO plugin by adding your site to Google Search Console and defining keywords; configure security by setting up scans and firewalls; and set your caching plugin options (enable HTML, CSS/JS minification, etc.).
- Create Key Pages: Don’t forget basic pages like About, Contact, and Privacy Policy (especially if using ads or affiliates). You can create these under Pages > Add New. Use the same block editor to format them.
- Enable SSL: Ensure your site uses HTTPS. Most hosts offer free Let’s Encrypt SSL. This is critical for security and SEO (browsers warn users on non-HTTPS sites).
Using the Gutenberg Block Editor
WordPress’s Gutenberg block editor is the default content editor (since WordPress 5.0 in 2018). It lets you build posts and pages by stacking “blocks” of content (paragraphs, headings, images, galleries, lists, videos, etc.). To create or edit content, go to Posts > Add New (or Pages > Add New) in your dashboard.
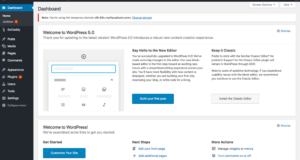
Screenshot: WordPress 5.0+ dashboard (welcome to Gutenberg editor).
In the block editor, each piece of content is a block. For example, to add text, add a Paragraph block; to insert an image, add an Image block; to list products, add a List block or a Product block (with WooCommerce). The editor interface has a top toolbar (for saving, undo/redo, document settings) and a sidebar for block-specific options. You can drag blocks to reorder them. Many blocks offer further settings (alignment, color, spacing). Overall, Gutenberg makes it easy to create media-rich layouts without any code.
(Tip: you can press / in the editor to quickly add a block by typing its name, e.g. /image.)
Using the block editor, format your posts with headings (H2, H3, etc.), lists, and images. Alt-text all images for accessibility and SEO. The editor will automatically generate an XML sitemap (with a plugin like Yoast) and handle responsive layouts. If you prefer the classic interface, you can install the Classic Editor plugin, but most new features and themes are optimized for Gutenberg.
Selecting a Theme
Your theme controls the look and layout of your blog. After installing a theme (via Appearance > Themes), you can customize it under Appearance > Customize or Editor. When choosing a theme (free or premium), look for:
- Gutenberg Compatibility: Ensure the theme is tested with the block editor. Many modern themes are explicitly “Gutenberg-friendly”. For example, the popular Sydney theme is advertised as “fast, Gutenberg-friendly”. OceanWP is a free theme noted as “Gutenberg-ready” with flexible demo sites.
- Responsiveness: Make sure it’s mobile-friendly. Responsive design is essential: themes featured by experts are chosen to look great on phones and tablets. Google now uses mobile-first indexing, so your blog must be smooth on mobile devices.
- Layout and Features: Check if the theme offers blog-specific layouts, sidebars, menus, and customization options. Some themes come with built-in page templates or support full-site editing (FSE), letting you customize headers/footers with blocks.
- Speed and Size: Lightweight themes load faster. Themes like GeneratePress or Neve are known for speed. Avoid bloated themes with too many features you don’t need. You can always add features via plugins if needed.
Once a theme is active, use the Live Customizer (or Site Editor for block themes) to tweak fonts, colors, and the homepage layout. Preview your changes before publishing. A good practice is to use a child theme (or theme customizer) for major style changes so you can update the parent theme safely.
Essential Plugins for Security, SEO, and Performance
Beyond what WordPress.com provides out of the box, a self-hosted WordPress.org site needs plugins for key functions. Here are top plugin categories (with examples):
- Security & Backups: Install a security plugin (Wordfence Security, iThemes Security, or Jetpack Security) to scan for malware and prevent attacks. Also use a backup plugin (UpdraftPlus, VaultPress/Jetpack Backup) so you can restore your site if needed. Always keep WordPress core, theme, and plugins updated: updates patch vulnerabilities.
- Spam Protection: Install Akismet Anti-Spam (free) to filter comments and form spam. This is built-in on WordPress.com but requires activation on WP.org.
- SEO: A dedicated SEO plugin is a must. For example, Yoast SEO generates XML sitemaps and structured data automatically and offers real-time content analysis. As you write posts, Yoast will prompt for meta descriptions, check keyword usage, and improve readability. This helps your pages rank higher and appear attractively in search results. (WordPress is already “designed with SEO in mind”, and these plugins enhance that.)
- Site Management (All-in-One): Jetpack (by WordPress.com) is a powerful plugin that combines security, performance, and stats. It can replace multiple plugins: “Jetpack is a comprehensive suite that replaces five or six separate plugins” (handling backups, security, performance, and analytics in one dashboard). Jetpack also offers a global CDN for images and static files.
- Performance & Speed: A caching/optimization plugin improves load times. You might use WP Super Cache, W3 Total Cache, WP Rocket (premium), or LiteSpeed Cache (if your host uses LiteSpeed). Additionally, optimize images with a plugin like Imagify or Smush: these compress images on upload. On WordPress.com, the built-in Page Optimize feature “removes unnecessary code and optimizes script timing so your pages load faster”. On WP.org, caching plugins and minification (HTML/CSS/JS) serve a similar purpose. Remember: site speed affects SEO and user engagement. Faster sites have lower bounce rates and rank better.
- Forms & Engagement: WPForms Lite or Contact Form 7 for contact forms. Editorial Calendar or PublishPress to schedule posts. MailPoet or Mailchimp plugins for email newsletters (WordPress.com even lists MailPoet as essential for email campaigns).
- Analytics: Use a plugin (e.g. Site Kit by Google) to integrate Google Analytics and Search Console. This gives you traffic stats and keyword data directly in your dashboard. On WP.com, basic stats are built-in, but on WP.org you’ll need to add analytics yourself.
After installing each plugin, configure its settings. For example, set up automated backups, define security scanning frequency, enter your Google Analytics ID, etc. Having these plugins active will make your blog robust and discoverable.
Basic SEO Optimization
Even with the right tools, you need to apply good SEO practices:
- Keywords & Content: Research keywords for your niche and include them in titles, headings, and content. Write clear, valuable content (500+ words per post) with proper use of H2/H3 headings.
- Permalinks: Use clean URLs (e.g. yourblog.com/my-post-title) by setting Settings > Permalinks to “Post name.”
- Metadata: Ensure each post/page has a unique meta title and description. SEO plugins help you add these.
- Categories & Tags: Organize your content with relevant categories and tags. This helps both users and search engines understand your site structure.
- Alt Text for Images: Always add descriptive alt text to images in the editor; this improves accessibility and can contribute to image search traffic.
- Mobile-Friendly Design: Ensure your theme is responsive. Google favors mobile-friendly sites. (As a reminder, WordPress themes are “mobile-ready” by default.)
- Speed & Core Web Vitals: A fast site is an SEO factor. Use the performance tips above. Studies show that sites passing Core Web Vitals see much better engagement. In fact, slow-loading sites often lose traffic.
- Submit to Google: Register your site in Google Search Console and submit your XML sitemap (generated by the SEO plugin). Also verify in Google Analytics for tracking.
- Internal Linking: When writing posts, link to your own related content (interlinking). This keeps readers on your site longer and spreads SEO value between pages.
- Schema & Rich Snippets: Use the SEO plugin or a schema plugin to add structured data (rich snippets) for articles, which can improve how your listing appears in search results. Yoast does basic schema for you.
- Security (Indirectly SEO): A secure site (HTTPS) is favored by Google. Make sure your SSL is active. Also, frequent malware scans (security plugins) ensure search engines don’t blacklist your site. Remember, WordPress itself is regularly patched to help keep sites secure.
By combining these on-page SEO steps with your plugins’ automated features, you’ll give your blog the best chance to rank well and draw organic traffic.
Performance Optimization
Site speed and reliability are critical. To optimize performance:
- Caching: As mentioned, install a caching plugin. WP Rocket or LiteSpeed Cache can significantly cut load times by serving static pages.
- Image Optimization: Compress images on upload (plugins like Imagify) and use modern formats (WebP).
- Lazy Loading: WordPress 5.5+ has built-in lazy loading for images. Ensure it’s enabled (it is by default).
- CDN: A Content Delivery Network (CDN) distributes your static files globally. You can use Cloudflare’s free CDN, or Jetpack’s Site Accelerator. This reduces server load and speeds up delivery for distant visitors.
- Minify & Combine: Minify CSS/JS files and combine them if possible. Caching plugins often do this for you. On WordPress.com, Page Optimize does it automatically.
- Remove Bloat: Disable or delete any plugins or widgets you don’t use. Each extra plugin can add scripts or database queries.
- Quality Hosting: Choose a fast host. Managed WordPress hosts like Kinsta, WP Engine, or Flywheel are optimized for speed (at a higher cost). Even shared hosts now often include server-level caching or LiteSpeed servers.
- Monitoring: Use tools like Google PageSpeed Insights or GTmetrix to test your site’s load time and Core Web Vitals. Aim for Largest Contentful Paint (LCP) under ~2 seconds and minimal layout shift (CLS). The new 2026 standard is quite strict, so optimizing media and scripts is key.
Remember: faster is better. Google explicitly factors page load time into ranking, and visitors abandon slow sites. As the WordPress.com blog notes, “Site speed matters… search engines factor load time into rankings… A faster site means better engagement, lower bounce rates, and more visibility in search results”.
Basic Security Practices
Security is often overlooked by new bloggers, but is vital. Follow these basic practices:
- Keep Everything Updated: This cannot be overstressed. Always update WordPress core, themes, and plugins as soon as updates are available. These updates often patch security vulnerabilities.
- Strong Credentials: Use a strong, unique password for your admin account and any user accounts. Don’t use “admin” as a username: rename it or create a new administrator account with a unique name. Consider enabling two-factor authentication (many security plugins support this).
- Limit Logins: Use a plugin to limit login attempts or block IPs after failed attempts.
- Security Plugin/Firewall: As noted, install a security plugin (Wordfence, Sucuri, etc.) or use a web application firewall (Cloudflare’s free plan can help block attacks). The goal is to “eliminate threats” (firewall, secure hosting) and “reduce risk” (strong passwords, strict user access, scanning). For example, Cloudflare’s guide emphasizes keeping your site updated and enforcing strict user access as key steps.
- Backups: Regularly back up your site files and database. If you’re on managed hosting, it might do this automatically. Otherwise use a plugin like UpdraftPlus. Store backups off-site (e.g. Dropbox, Google Drive) and test that they work.
- SSL/HTTPS: Always use HTTPS. Modern browsers mark non-HTTPS sites as insecure. Most hosts provide Let’s Encrypt SSL for free; enable it and force HTTPS in WordPress (Settings > General URL should be https).
- Plugins and Themes: Only install plugins/themes from reputable sources. Remove any that you’re not using. Even inactive plugins can pose a security risk if not updated.
- Monitor and Scan: Periodically scan your site for malware using your security plugin or an external tool. Look at your hosting logs for unusual activity.
- Least Privilege: Only give users the access they need. For example, only admins can install plugins; authors can write posts.
By doing these, you’ll greatly reduce the chance of a hack. Keep in mind: according to security experts, “Users can improve WordPress security by keeping their site updated, enforcing strict user access requirements, and regularly scanning for critical vulnerabilities”. Even simple steps like these will protect your site and your visitors’ trust.
Monetizing Your Blog (Cuelinks & Affiliates)

Once your blog is live and has content, you can monetize it in several ways. One effective method is affiliate marketing: recommending products and earning commission. For example, Cuelinks is an Indian affiliate platform that lets you join dozens of affiliate programs quickly. By signing up for Cuelinks, you can generate affiliate links for sites like Amazon India, Flipkart, Myntra, etc. The Cuelinks blog explains: “Affiliate links let you earn a commission when readers click and buy products you recommend… using Cuelinks can make affiliate linking even easier and more powerful.”.
To monetize with Cuelinks:
- Sign Up: Create an account on Cuelinks.
- Browse Programs: Activate relevant merchant programs (e.g. Amazon, Myntra) in your Cuelinks dashboard.
- Generate Links: Whenever you mention a product on your blog, paste its URL into Cuelinks to get a tracked affiliate link. Insert this link in your post (anchor text or buttons).
- Disclose: Always add a disclosure like “This post contains affiliate links” to comply with regulations.
- Promote: Share your blog posts on social media. Each click from your site to a retailer using your affiliate link earns you a small commission if a purchase is made.
Aside from affiliates, you can also use Google AdSense or similar ad networks on a WordPress.org blog (WordPress.com Business plan has its own WordAds program). But affiliate marketing often pays better for niche bloggers, since it ties directly to product recommendations.
Cuelinks Tip: Cuelinks integrates well with WordPress. You can manually insert links, or use their WordPress plugin/widget to search for products and automatically convert links on your site. This streamlines the process of linking, as noted in their Affiliate Links guide.
Checklist: Quick Setup Summary
- Choose Your Platform: Decide between WordPress.com (hosted) or WordPress.org (self-hosted).
- (If WP.com) Sign Up: Go to WordPress.com, click Get Started, and follow the wizard to create your account. Pick a site address (WordPress.com subdomain or custom domain).
- (If WP.com) Plan & Theme: Select a plan (free or paid), then choose a theme. Use Appearance > Editor to customize your design and menu.
- (If WP.org) Get Hosting & Domain: Register a domain and buy hosting that supports WordPress. Use your host’s installer or manually install WordPress (download from WordPress.org).
- Login to Dashboard: Go to /wp-admin on your site, log in, and set your site title/tagline under Settings > General. Configure permalinks (set to “Post name”).
- Install Theme: Under Appearance > Themes, add and activate a Gutenberg-friendly, responsive theme (e.g. Sydney, Astra, OceanWP). Use Customize to tweak colors, logo, and layouts.
- Install Plugins: Go to Plugins > Add New. Install key plugins: Jetpack (security/backup), a security plugin (Wordfence), an SEO plugin (Yoast or AIOSEO), a caching plugin, an image optimizer (Imagify), and WPForms for contact forms.
- Create Content: Use Posts > Add New to write your first posts with the Gutenberg editor. Add blocks for text, images, and embeds. Publish at least 3–5 solid posts to start.
- Optimize SEO: Use your SEO plugin to set meta titles/descriptions and generate a sitemap. Add keywords naturally in content. Submit the sitemap to Google Search Console and connect Analytics (via Site Kit). Ensure images have alt-text.
- Set Up Performance: Enable caching and lazy loading. Compress images. Optionally set up a free CDN (e.g. Cloudflare). Test your site speed and fix any major issues (slow images, unminified scripts).
- Secure & Backup: Activate your security plugin and run an initial scan. Set up regular backups. Enable HTTPS if not already. Delete any unused plugins/themes.
- Monetize: Sign up for Cuelinks and other affiliate programs, then add affiliate links to relevant product mentions. Consider adding a “Subscribe” form to collect emails for newsletters.
- Promotion: Link your new blog to social media (many themes have social media buttons). Network in your niche. Engage early readers by sharing your blog.
By following these steps, you’ll have a fully functional WordPress blog, optimized for readers and search engines alike. Remember to keep learning: WordPress is constantly evolving. Check the WordPress.com support guides and the WordPress.org documentation for updates. Good luck, and happy blogging!

Sahil Ajmera is content writer with more than 7 years of work experience in field of Affiliate Marketing, Digital Marketing, etc. He loves saving money on everything. His aim is to get readers exactly what they are looking for and that too without wasting much of their time. Whatever he is writing on, you are sure to find a way to earn & save good!